I started using Dzine AI because I wanted one place where I could create an image, correct the parts that looked wrong and turn the finished result into other formats. Most AI generators handle the first step well, but the process often becomes fragmented once an image needs editing, character consistency or motion.
Dzine attempts to keep those stages inside one workspace. After using it for product visuals, targeted image edits, a recurring character and a short promotional video, I found that its real strength was not generating a perfect image immediately. It was giving me several ways to continue working when the first result was only partly right.
What Dzine AI Does
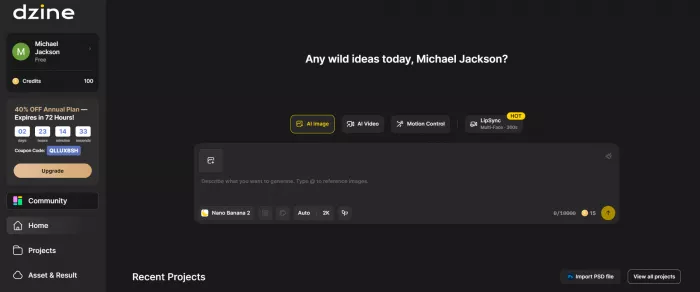
Dzine AI is a browser-based visual creation platform that combines AI image generation, image editing, video generation, character tools, lip sync, enhancement and basic 3D features.
It works with both written prompts and uploaded assets. I could begin with a description, use an existing photograph, combine several reference images or arrange visual elements on a canvas before asking the AI to generate a new composition.
Dzine also provides access to several image and video model families through the same interface. Its current platform includes models such as Nano Banana, Seedream, Flux, Qwen Image, Midjourney, Kling, Wan, Hailuo, Sora and Veo, although the models available and the credits required depend on the selected plan and workflow.
That model selection changes the character of the platform. Dzine is not one AI model with a set of editing buttons around it. It is closer to a visual workspace where different models can be selected according to the job.
One model may follow a commercial photography prompt closely, while another may produce more imaginative artwork. A separate model may be better for text inside an image, and a video model may provide stronger camera movement than the one used for still visuals.
Alongside generation, Dzine includes Local Edit, object insertion, object removal, generative expansion, background removal, face swapping, hand repair, image enhancement and conversational editing. It also offers character training, style training, product-background generation, image-to-3D conversion and multiple export options.
Its video side covers text-to-video, image-to-video, reference-to-video, video modification, lip sync and video enhancement. Recent updates have added Ideogram 4.0 to Chat Editor and expanded the video workflows with Gemini Omni Flash and Grok Imagine 1.5.
The range is substantial, but that does not mean every user will need every tool. My experience improved once I stopped exploring the platform as a catalogue and began using it for complete pieces of work.
Starting With a Product Image
The first project I created was a hero image for a fictional skincare product. I wanted a realistic glass serum bottle placed on a light stone surface, with soft morning light, a few restrained botanical elements and enough empty space for advertising copy.
I began with a text prompt rather than uploading a finished product photograph. My prompt described the bottle material, camera angle, lighting, background and overall mood. I also asked Dzine to avoid excessive decorative objects because product generators often crowd the scene with leaves, flowers and water droplets.
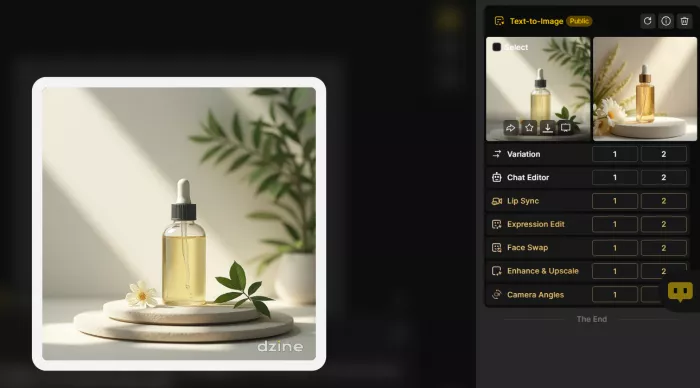
The first result was visually strong. The bottle sat naturally on the surface, the lighting looked like commercial photography and the background had enough detail to feel intentional without distracting from the product.
The problem appeared when I opened the image at full size. The larger brand name looked convincing, but the smaller label text was not readable. Some letters resembled real words without forming an accurate copy. The cap also changed slightly between variations.
I shortened the prompt and removed most of the packaging instructions. Instead of asking the model to generate a fully designed label, I requested a clean bottle with a simple blank label area that I could complete later.
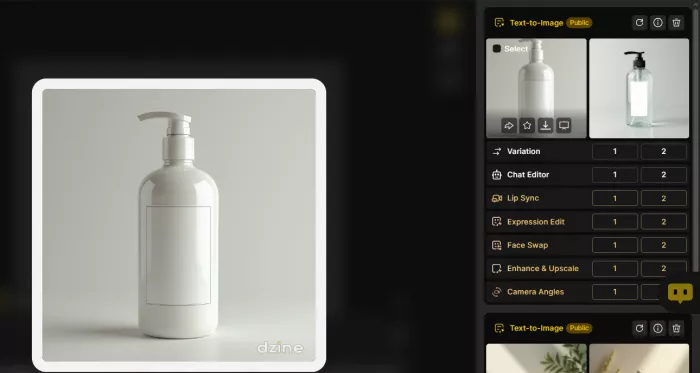
That produced a more usable image. The second composition was less decorative, but the bottle shape was more stable and the label area was clean enough for adding real typography afterward.
This was the first lesson I learned from Dzine: an image can be visually polished without being commercially finished.
For blog covers, mood boards, social posts and concept visuals, the first generation may be enough. For a product advertisement, packaging mock-up or branded campaign, small text and exact product details still need manual attention.
Dzine gave me several image models to choose from, but switching models did not remove the need for that inspection. One model interpreted the composition more accurately, while another produced more attractive materials and lighting. Choosing between them was less about finding the universally best model and more about deciding which weakness would be easier to correct later.
The experience also showed why Dzine’s canvas matters. The official image-to-image workflow allows users to place images, shapes and other visual elements on the canvas before generation. Dzine then attempts to preserve the relative position, size and orientation of those elements in the generated result.
I used that approach for a second version of the product scene. I placed the bottle near the centre, added a background reference and reserved open space on the left for text. The generated image did not reproduce the arrangement with layout-software precision, but it respected the hierarchy more closely than the prompt-only version.
The bottle remained the main subject, and the empty space survived well enough for the intended advertisement. That gave me more control over the composition without writing increasingly long spatial instructions.
Editing Without Starting Again
The editing tools became more valuable than the original generator once I had a result I wanted to keep.
One version of the product image contained a large leaf that partly covered the bottom of the bottle. The rest of the image worked. Regenerating the entire scene would have risked changing the lighting, product shape and surface texture.
I selected the leaf and used Local Edit to remove it.
The first edit removed the object cleanly and rebuilt the stone surface beneath it. At normal viewing size, the correction blended into the scene. At full size, I noticed that part of the bottle’s shadow had become softer where the leaf had been.
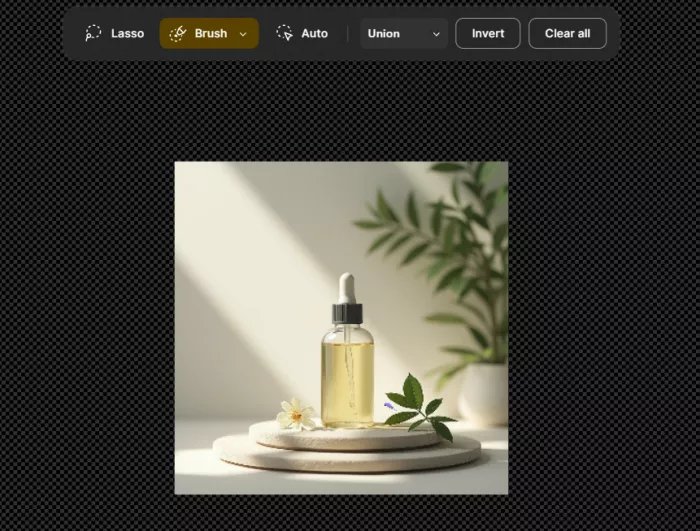
I made a second, tighter selection around the affected area rather than editing the entire lower section again. The new result preserved more of the original shadow and looked natural enough for the final image.
This is where Dzine felt more practical than a prompt-only generator. I did not have to discard an otherwise useful composition because of one unwanted detail.
Local editing worked best when I gave it a narrow task. Removing one object, changing a small section of a background or repairing a contained area produced fairly predictable results. Broad instructions gave the AI more freedom than I wanted.
I saw that when I asked Dzine to change the original studio background into a warm bathroom interior. The request was completed, but the platform did not treat the background as an isolated layer. It adjusted the light on the bottle, altered the reflection and changed the colour of the stone surface.
The new scene was attractive, but it was a reinterpretation rather than a simple replacement.
That difference is worth understanding before using the editor. Dzine can make targeted changes, but the output remains generative. Nearby details may shift because the model is rebuilding part of the image rather than moving pixels in the way a traditional photo editor would.
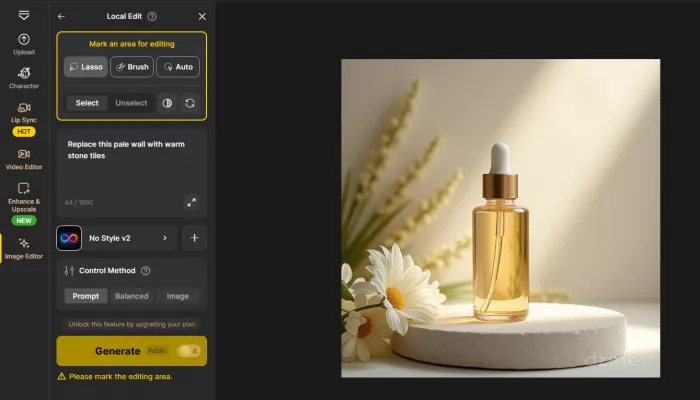
The more specific my instruction and selection became, the easier the result was to control. “Remove the leaf beside the bottle” worked better than “make the composition cleaner.” “Replace this pale wall with warm stone tiles” was more reliable than “make the setting feel luxurious.”
Dzine currently charges four credits for tools such as Local Edit, Insert Object, AI Eraser and Hand Repair, while Generative Expand costs eight credits. These advanced editors require a paid subscription. Background removal is available across plans and currently costs two credits.
Those individual costs are small, but they accumulate when a single asset needs several corrections. The credit system encourages a more deliberate workflow: choose the strongest base image, inspect it carefully and edit only the problems that would prevent its use.
I also tried Chat Editor, which allows changes to be requested through ordinary language. It was useful for larger creative decisions, such as changing the environment, restyling a scene or producing variations from a reference.
For precise work, I still preferred selecting the affected area manually. Chat-based editing was better for exploring alternatives, while Local Edit was better for protecting the parts of an image I already liked.
Keeping a Character Recognizable
The next feature I used was Consistent Character. I wanted to see whether I could create a recurring person for a set of skincare visuals rather than using a different AI-generated face in every image.
I started with a clear portrait of a fictional spokesperson. The image showed the face from the front, used even lighting and did not contain accessories that might confuse the character model.
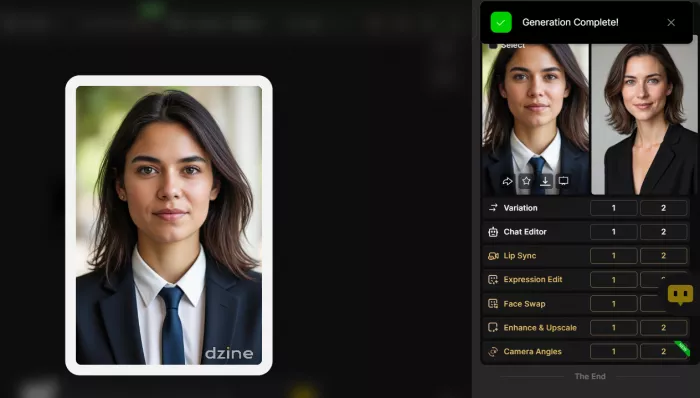
After creating the character, I placed her in three scenes. The first was a close portrait holding the serum bottle. The second was a wider bathroom image. The third was an outdoor lifestyle scene with different clothing, stronger side lighting and a more dramatic camera angle.
The first two images looked like the same person. The eye shape, hair colour and basic facial proportions remained close enough that I could have used the visuals in one campaign.
The third image was less consistent. It still resembled the original character, but the jawline narrowed, the eyes became larger and the hairstyle changed. On its own, the result looked good. Beside the other two images, the identity drift was obvious.
The problem became easier to understand when I considered how many variables I had changed. The third prompt introduced a new setting, camera angle, outfit, hairstyle, expression and lighting condition at the same time.
Dzine’s character system was useful, but it did not remove the need to plan for consistency. A character model has a better chance of preserving identity when changes are introduced gradually.
This makes the feature suitable for social campaigns, illustrated stories, recurring blog characters and simple advertising sequences. It is less dependable when exact continuity is required across extreme poses, dramatic lighting and widely different visual styles.
Dzine currently lists character training at 30 credits. Character generation costs four credits in Fast Mode or eight credits in Normal Mode, while the number of private characters that can be stored depends on the subscription tier.
The feature saved time compared with generating unrelated people and trying to make them resemble each other afterward. Still, I would describe the result as controlled resemblance rather than perfect identity locking.
Turning the Image Into Video
Once the product image was finished, I used it as the starting frame for a short promotional video.
I kept the first motion prompt simple. I asked for a slow camera push toward the bottle, subtle leaf movement and a gentle change in the reflected light. The product itself was supposed to remain still.
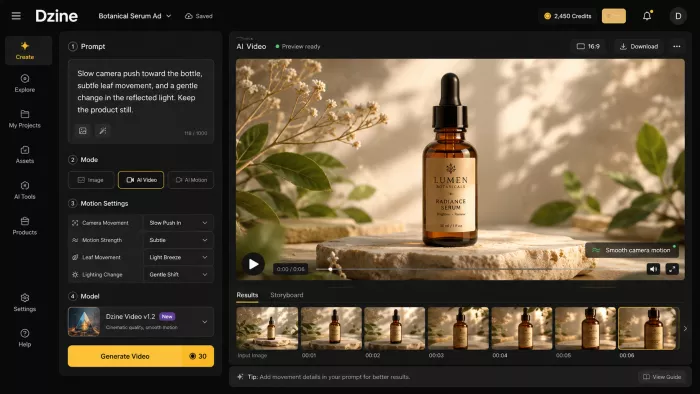
That decision helped. The completed clip added movement without destroying the image that made me choose it in the first place. The bottle stayed recognizable, the camera motion was smooth and the background movement was restrained enough for a social advertisement or website banner.
I then made the prompt more ambitious. I requested faster camera movement, a slight product rotation and stronger motion in the surrounding leaves.
The second clip was more dramatic, but less usable. The bottle changed shape during the rotation, the label softened between frames and one leaf appeared to merge briefly with the cap.
This result was a good reminder that more motion does not automatically create a better video. Image-to-video worked best when I treated the original picture as an approved composition and asked the model to animate around it.
The further the clip moved from that starting image, the more opportunities there were for the product, text and small details to change.
Dzine supports numerous video models with very different credit requirements. Its current credit table lists options ranging from 20 credits for five seconds with Dzine Video V2 to 400 credits for five seconds with Google Veo 3.1. Other models, including Kling, Wan and Hailuo, fall between those points.
That range gives users flexibility, but it makes casual video comparison expensive. Testing four or five premium models can consume more credits than creating many still images.
My approach became simple: finish the source image first, decide exactly what movement the asset needs and then choose the video model. Starting with video before settling the still composition would have wasted both time and credits.
Dzine’s video tools are useful for product motion, short social clips, concept previews, animated illustrations and simple campaign assets. They do not replace a timeline-based editor for detailed cutting, sound design, transitions or frame-by-frame correction.
The Wider Toolset
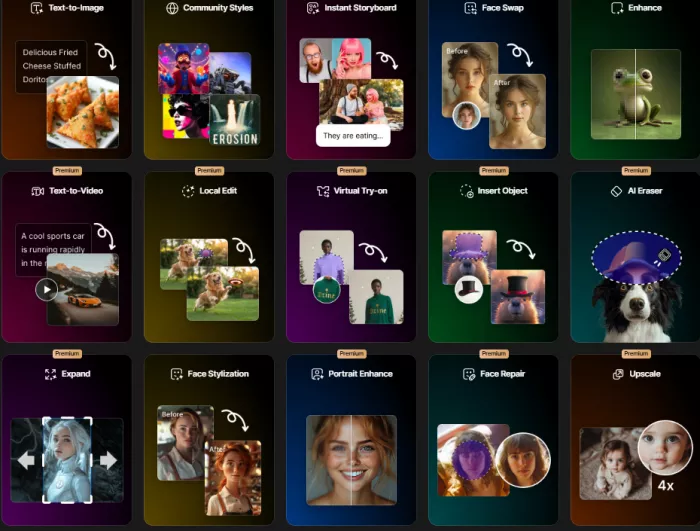
I concentrated most of my time on image generation, editing, character consistency and image-to-video because those tools formed a connected workflow. Dzine includes several other services that broaden what can be produced inside the platform.
Lip sync can animate a still image or existing clip using recorded audio or a written script. Dzine also supports multiple-character lip sync, dialogue generation, talking avatars, podcast-style videos and text-to-speech. The platform says its multi-character workflows can animate more than one face in the same scene.
For creators producing presenter videos or fictional conversations, this could reduce the need for a separate avatar platform. Results will still depend on the quality of the source image. A clear, forward-facing face with a visible mouth gives the system a stronger foundation than a profile image or heavily stylized character.
The product tools extend beyond background generation. Dzine includes virtual try-on, clothing changes, product photography, image combining and enhancement. These features are practical for campaign concepts and e-commerce content, although generated try-on results should not be treated as exact representations of physical fit, colour or fabric behaviour.
Image enhancement and upscaling are most useful near the end of the process. I found that enhancement could improve a clean image, but it could not repair incorrect typography or structural problems. Enlarging a flawed label only made the flaw easier to see.
The correct order was to repair the image first and upscale it after the content was stable.
Dzine also offers image-to-3D conversion and 3D model export on eligible plans. I would treat those outputs as starting assets for visualisation rather than technically finished models. Projects involving animation, manufacturing or precise geometry will still need proper 3D software and manual inspection.
The broad toolset is both the attraction and the source of some confusion. Dzine can reduce the number of separate AI services a creator uses, but it takes time to learn which path is most efficient.
Pricing and Credit Value
Dzine uses a subscription and credit system. New free accounts currently receive 100 credits that remain valid for 12 months and can be used for image or video creation. The free account is enough to explore a few workflows, but it is not designed for continued production.
As of August 7, 2026, the regular subscription prices are:
| Plan | Monthly price | Annual billing | Included credits |
| Beginner | $8.99 per month | $84 per year, equal to $7 monthly | 1,000 per month |
| Creator | $24.99 per month | $240 per year, equal to $20 monthly | 6,000 per month |
| Master | $59.99 per month | $600 per year, equal to $50 monthly | 9,000 plus eligible unlimited image models |
| Master Pro | $149.99 per month | $1,440 per year, equal to $120 monthly | 30,000 plus eligible unlimited image models |
Dzine was advertising a temporary 50 percent first-month offer when I checked the pricing page, but that discount should not be confused with the normal recurring rate.
The Beginner plan includes private generation, commercial use, 10 GB of storage and up to eight concurrent jobs. Creator increases the monthly credit balance substantially and allows unused credits to roll over for up to three months. Master raises storage to 100 GB, supports more saved characters and styles and includes unlimited access to listed image models under the fair-use policy. Master Pro is positioned for higher-volume users with 30,000 credits, 200 GB of storage and more concurrent jobs.
The plan names alone do not show the real value because individual models consume credits at different rates.
Nano Banana 2 is listed at 15 credits per image, Nano Banana Pro at 50, Seedream 5.0 Lite at eight and Dzine Imagine Quality at 30. On the video side, a five-second generation may cost 20 credits with one model and several hundred with another.
This means the useful calculation is not how many generations a plan includes. It is how many completed assets remain after variations, failed outputs, edits, enhancement and video conversion.
For occasional image creation, Beginner may be sufficient. Creator is the more balanced plan for someone working regularly with both images and videos. Master becomes attractive when image volume is high enough to benefit from the unlimited models.
The unlimited access requires explanation. Dzine’s fair-use policy states that it is intended for reasonable, human-initiated creative use. Automated scripts, continuous batch generation and disproportionate resource use can lead to reduced generation speed, restricted models or suspended unlimited privileges. The policy also allows model-specific limits because different models carry different operating costs.
Unlimited therefore means broad manual access within Dzine’s usage conditions. It does not mean unrestricted automated production.
Strengths and Friction
Dzine’s strongest quality is continuity between tasks. I could move from generation to correction and then into video without rebuilding the project in several unrelated services.
The canvas gave me more control over composition than a prompt alone. Local editing let me protect a good image instead of regenerating it. Character tools created enough visual continuity for a small campaign, and image-to-video made it possible to repurpose a completed asset.
Its weaknesses appeared when the workflow became more precise.
Small product text still needed correction. Local edits sometimes affected lighting or shadows outside the intended change. Character identity weakened when I changed too many details at once. More ambitious video motion introduced distortion.
The interface also takes time to understand because several tools can solve similar problems. A new user may not immediately know whether a task belongs in Chat Editor, Local Edit, Image-to-Image, Product Background or a dedicated utility.
| Where Dzine helped | Where I met limits |
| The canvas gave the model a clearer composition to follow. | The generated layout still shifted slightly and did not behave like a fixed design file. |
| Local editing saved an image that contained one unwanted object. | A wider edit changed lighting and nearby details that I wanted to preserve. |
| Consistent Character kept the person recognizable across similar scenes. | Identity weakened after major changes to angle, wardrobe and lighting. |
| Image-to-video added useful motion to an approved still. | Strong movement caused the product shape and label to drift. |
| Multiple models gave me options for different creative tasks. | Comparing too many models increased credit use and decision time. |
Dzine did not remove the need for judgment. It changed where that judgment was applied. Instead of creating every visual manually, I spent more time choosing the right starting result, protecting successful details and deciding when another generation was no longer worthwhile.
Privacy and Ownership
Dzine processes uploaded images, prompts, generated outputs, account information and platform-usage data, so privacy settings matter, particularly for client or business work.
Images generated through free-plan accounts are public and may be selected for the Dzine community feed. Private generation is available to subscribed accounts. This means I would not upload confidential campaign materials, private client photography or unreleased products through a free account.
Dzine’s privacy policy states that it may collect account, usage, transaction and service-interaction information to operate and improve the platform, provide support, prevent fraud and develop new features. The company says it does not sell or rent personal information for commercial or marketing purposes, although data may be shared with vendors, service providers, legal authorities or a future acquiring business where necessary.
Its security whitepaper states that user-generated data is not reused for model training without consent. It also reports AWS storage in SOC 2-certified environments, AES-256 encryption at rest, TLS 1.2 or higher in transit, role-based access controls and permanent-deletion options. These are Dzine’s published security claims rather than findings from an independent audit conducted for this article.
Paid users may use generated content commercially to the extent allowed by applicable law, while the free tier is limited to personal projects. Commercial permission does not override copyright, trademark, privacy or publicity rights attached to uploaded material or recognizable people.
A user is still responsible for having permission to upload an image and for checking whether the finished result infringes someone else’s rights.
Who Dzine Suits
Dzine makes the most sense for people whose work continues after the first generation.
A marketer creating a product campaign may need a hero image, several background versions and a short video. A creator may need a consistent character for thumbnails and social posts. An e-commerce seller may want to clean a product image, place it in a lifestyle setting and create advertising variations.
Those workflows can benefit from having generation, editing and motion tools in the same account.
Someone who only wants occasional AI artwork may find the platform larger and more complicated than necessary. A single-purpose generator could provide a faster experience.
Dzine is also not a full substitute for Photoshop, Illustrator, Premiere Pro, DaVinci Resolve or professional 3D software. It is strongest at accelerating visual creation and correction, not providing exact pixel, vector or frame-level control.
The Verdict
My opinion of Dzine improved once I stopped judging it by the first image it generated.
The original product visual looked polished but contained unusable label text. The editing tools helped me keep the composition while removing an unwanted object. Consistent Character worked well when I changed one or two variables at a time, but became less reliable when I altered the entire scene. Image-to-video produced a useful promotional clip when the motion remained subtle and damaged the product when I pushed the animation too far.
Those experiences describe Dzine more accurately than its feature count.
It is not a one-click system for flawless visual production. It is a flexible workspace for getting an asset closer to finished without returning to the beginning every time something goes wrong.
Its best features are the canvas, targeted editing, model selection and the connection between still images and video. Its main limitations are the crowded interface, uneven precision, variable credit costs and the need to inspect every output at full size.
For a creator or small team producing regular visual content, the Creator plan offers the most balanced starting point. Users focused mainly on high-volume image work may get more from Master, provided they understand the fair-use limits behind its unlimited access.
Overall, I would rate Dzine AI 8.2 out of 10.
The platform did not replace my need for careful editing. What it did was reduce how often I had to abandon a promising result and generate the whole idea again. That is where Dzine provided the most practical value.
Comments