Table of Contents
- What Is AI Object Removal?
- What Can AI Remove From Photos?
- How to Remove an Object From a Photo Using AI
- How to Handle Tricky Objects
- See It in Action
- Why AI Object Removal Sometimes Looks Fake
- How to Get Cleaner, More Natural Results
- What Makes an AI Object Removal Look Real?
- AI Tools for Removing Objects from Photos
- AI Object Removal vs Photoshop
- Can AI Remove Anything From a Photo?
You finally got the shot. The light was right, everyone was smiling, and then you look closer and notice a stranger's elbow in the corner of the frame and a trash can behind your subject, or a tangle of power lines slicing through an otherwise perfect sky. A few years ago, fixing that meant opening Photoshop, learning the clone stamp tool, and spending twenty minutes nudging pixels around. Today, AI can do most of that work in seconds.
But "AI object removal" isn't magic erasing. The tool isn't just deleting pixels. It's making an educated guess about what should be there instead, based on everything around the gap you've created. That distinction matters, because it explains both why AI removal can look astonishingly good and why it sometimes falls apart on certain photos. Understanding how the technology thinks is the fastest way to get results that actually hold up.
This guide walks through how AI object removal works, what it can and can't handle well, and the specific techniques that separate a clean edit from an obviously fake one.
What Is AI Object Removal?
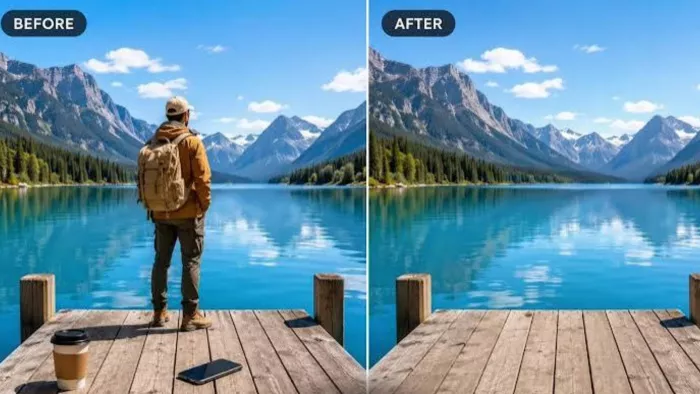
AI object removal is a three-step process, even though it feels instant to the user.
First, the tool identifies the region you want removed, either because you painted over it or drew a box around it, or because you tapped it and let the AI detect the edges itself. Second, it studies the pixels surrounding that region: colors, textures, lines, lighting direction, and repeating patterns. Third, it generates new pixels to fill the gap, using a technique generally called inpainting, and blends the new content into the surrounding image so the seam isn't visible.
The "generating" part is where modern AI tools differ from older software. Older clone-and-heal tools literally copied pixels from another part of the same photo. Modern AI models, trained on huge numbers of images, can synthesize entirely new content that never existed in your photo at all: a plausible patch of grass, or a continuation of a wall. This is more powerful, but it also means the AI is inventing something.
It's making its best guess, not recovering the hidden truth. That single idea is the key to understanding almost every strength and weakness discussed in this article.
What Can AI Remove From Photos?
AI object removal tools can handle a wide range of subjects, but not all of them are equally difficult. Here's a realistic breakdown.
Generally easy:
- Small, isolated objects on simple backgrounds (a stray water bottle on a table, a sign on a plain wall)
- Solitary people standing against sky, grass, water, or an unpatterned surface
- Dust spots and sensor smudges, or small blemishes
Moderate difficulty:
- People or objects standing in front of moderately busy backgrounds, like a street with some texture but no repeating pattern
- Cars parked in front of buildings or foliage
- Furniture in front of plain walls or floors
- Shadows cast by the object you're removing (these often need a second, separate fix)
Genuinely difficult:
- People or objects covering complex, detailed backgrounds, such as crowds and detailed architecture, or busy foliage
- Wires and cables, and other thin objects that cross large parts of the frame
- Reflections in glass and mirrors, or in water
- Objects near faces and hands, or other body parts, where the AI has to reconstruct anatomy convincingly
- Patterned surfaces like brick, tile, fences, or repeating wallpaper
- Large objects that obscure a significant portion of the image, especially if that area contained unique details
The pattern here is straightforward: the more predictable and uniform the hidden background is, the better AI performs. The more unique and detailed, or structured, that background is, the more the AI has to guess. Guessing is where mistakes creep in.
How to Remove an Object From a Photo Using AI
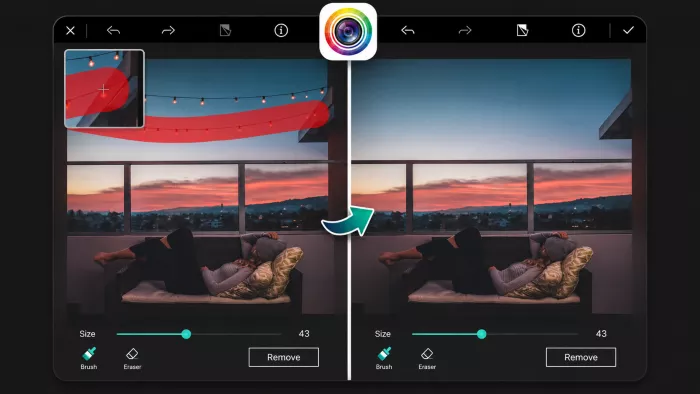
The core workflow is similar across most AI object-removal tools, whether you're using a mobile app or a browser-based editor, or a plugin inside a design tool.
- Choose the best-quality original. Start from the highest-resolution, least-compressed version of the photo you have. AI tools work with pixel data, and a low-resolution or heavily compressed image gives the model less accurate information to work from, which shows up as mushy, indistinct patches after editing.
- Open an AI object-removal tool. Most modern photo editors, on mobile and desktop, now include some form of AI-assisted removal, often labeled "remove," "erase," "clean up," or “magic eraser.”
- Select the unwanted object accurately. This is the single most important step. You might use a brush or a lasso, or rely on automatic detection when you tap the object. The goal stays the same: mark exactly what needs to go, and nothing more. A sloppy selection either leaves ghost edges behind or forces the AI to reconstruct more of the image than necessary.
- Generate the replacement. Let the tool process the selection. Depending on the app, this can take anywhere from under a second to several seconds, especially for larger selections.
- Inspect the result at full zoom. Don't judge the edit from a thumbnail. Zoom in on the edited area and its borders to check for blurring and warping, or mismatched texture.
- Refine the selection if needed. If the first pass leaves an odd texture, a faint outline, or a slightly wrong color, redo the selection, often smaller and more precise this time, and run the tool again on just that area.
- Export the final image. Save a copy rather than overwriting your original, especially if you're editing in multiple passes. If you need to make further adjustments later, you'll want the source file intact.
This looks simple written out, but the quality gap between a great result and a mediocre one almost always comes down to steps 3 and 6: how carefully the selection was made and refined.
How to Handle Tricky Objects
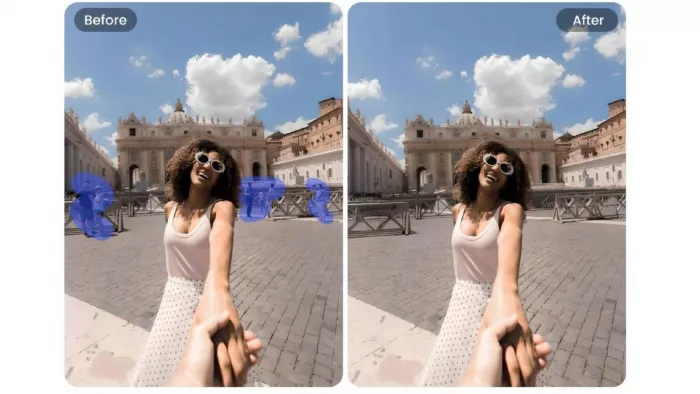
This is where most guides stop short. Here's how to actually approach the hard cases.
People covering complex backgrounds. If a person is standing in front of something detailed, such as a building facade, or a crowd near patterned tile, the AI has to invent all of that detail from scratch. Improve your odds by making the selection tight around the person's silhouette rather than a rough box. A tighter selection gives the AI less to reconstruct and more surrounding context to work from on all sides.
Objects near faces or hands. AI models are especially prone to distorting anatomy because faces and hands have specific, unforgiving structures: a slightly wrong finger count or an oddly shaped jaw is instantly noticeable, even to someone who can't say exactly what's wrong. When removing an object near a face or hand, keep your selection as far from the anatomy as the object allows, and inspect that area closely afterward. If it looks even slightly off, undo and try isolating just the object in a smaller, more conservative selection.
Patterned walls, tiles, bricks, and fences. Repeating patterns are deceptively hard for AI because a single misaligned brick or tile break is obvious to the human eye, even though the AI "knows" it should repeat a pattern. The fix is patience: work in smaller sections rather than one large selection, and check pattern alignment after each pass. Some tools let you nudge or clone a small patch manually afterward if the AI's version is close but not quite aligned. This hybrid approach often beats a single AI pass.
Wires and thin objects. Wires and cables, along with power lines, are difficult not because they're complex, but because they're long and thin, crossing multiple different backgrounds (sky, building, foliage) along their length. Rather than selecting the entire wire in one pass, break it into shorter segments and remove each against its local background. This gives the AI a simpler, more localized guess to make at each step instead of one long, inconsistent one.
Reflections. Reflections in water and glass, or mirrors, are tricky because they aren't just background - they're a distorted, secondary version of something else in the scene. AI often either flattens the reflection into a flat color or invents something that doesn't logically match what's being reflected. Reflections are one of the areas where manual editing frequently still outperforms AI, particularly if the reflection needs to remain physically accurate.
Objects over water. Water has a natural texture and color gradient that's easy to approximate but hard to match exactly, especially with ripples and reflections, or changing light. Small removals over water usually turn out well; large removals near the shoreline or where the water meets structure tend to need extra refinement passes.
Large objects covering important background details. If a large object is blocking something unique, such as a specific landmark and a group of people, or distinctive architecture, remember that the AI has no way to know what was actually there. It will generate something plausible, not something accurate. If preserving the true background matters, this is a case where you may need a second photo of the same scene without the obstruction, or accept that the area will be a stylistic approximation rather than a faithful recreation.
The easiest edits are not always the hardest to fix. A tiny blemish removal can sometimes look worse than a large sky replacement, simply because small errors in a small space are more visually jarring than the same error spread over a larger, less-scrutinized area.
See It in Action
Before-and-after comparisons make these differences much easier to judge than description alone. If you're publishing this article, it's worth pairing the sections above with real example images rather than stock photos, since the whole point is to show what genuine AI output looks like on real edits. Useful pairs to include:
- Person removal: a photo with a stray photobomber against a simple background, next to the cleaned result.
- Wire removal: a sky or building shot with power lines, before and after a segmented, multi-pass removal.
- Complex background: a person removed from in front of architecture or foliage, showing where the AI had to reconstruct fine detail.
- Patterned surface: a tile and brick edit, or a fence edit, showing whether the pattern lines up correctly after removal.
- Bad vs. corrected result: a first-pass edit with a visible flaw (a blurry patch and broken pattern, or a leftover shadow) next to the same edit after a refined selection or second pass.
Why AI Object Removal Sometimes Looks Fake
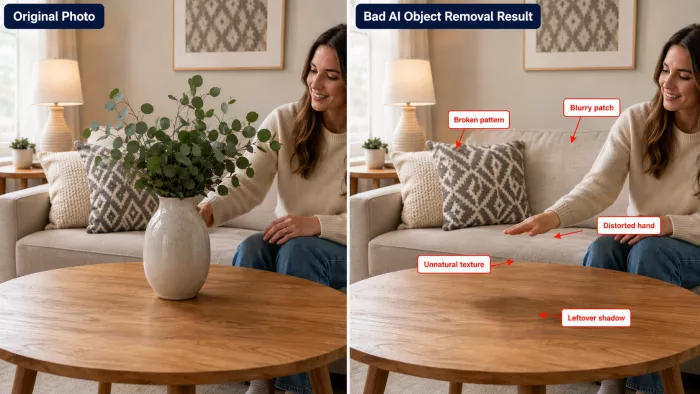
Even good tools produce bad results occasionally. Recognizing the failure pattern helps you fix it faster.
Blurry patches. Usually caused by low source resolution or an overly large selection area. Fix: start with a higher-resolution image, or break large selections into smaller ones.
Distorted faces or hands. Common when the removed object was close to a person. Fix: keep selections tighter and farther from anatomy, and manually retouch small errors if the AI can't fully resolve them.
Broken patterns. Happens on tile, brick, fences, and fabric. Fix: work in smaller sections and check pattern alignment as you go, rather than trusting one large automatic fill.
Unnatural edges. A faint outline or color shift around the edited area, often from a selection that was slightly too tight or too loose. Fix: redo the selection with a small buffer beyond the object's actual edge, and feather it slightly if your tool allows.
Incorrect shadows. Removing an object but leaving its shadow behind (or vice versa) is one of the most common giveaways in AI-edited photos. Fix: treat the shadow as a separate object and remove it in its own pass.
Duplicated objects. Occasionally an AI model will "hallucinate" a partial copy of a nearby object into the filled area. Fix: this usually means the selection was too small relative to a busy surrounding area - widen it slightly and retry.
Strange textures. A patch that's technically smooth and colored correctly but doesn't match the material - plastic-looking grass, waxy-looking skin. Fix: this is often a sign the AI didn't have enough surrounding texture to reference; try a tighter crop around just the problem area so the tool has less to average out.
How to Get Cleaner, More Natural Results
A few habits consistently separate convincing edits from obvious ones.
- Make precise selections. A clean, accurate outline gives the AI the clearest possible instructions.
- Work in smaller sections. Especially for large or complex removals, multiple small passes usually beat one large one.
- Remove shadows separately. Don't assume the AI will catch a cast shadow automatically. Check for it and remove it as its own step.
- Use multiple passes. If the first result is 90% there, don't settle. A second, targeted pass on just the flawed area often fixes it.
- Inspect at 100% zoom. Thumbnails hide flaws. Always review the edited area at full resolution before exporting.
- Compare before and after. Toggling between the original and edited version makes subtle problems, like a shifted horizon line or a mismatched shadow, much easier to spot.
- Preserve important edges and textures. When possible, keep your selection just outside the object rather than cutting into it, so the AI has real texture to blend from rather than guessing at edges too.
Start with a high-resolution image. More pixel data means more accurate texture and color, plus better lighting information, for the AI to work with.
A clean selection often matters more than the AI tool itself. Two different tools given the same careful selection will usually produce more similar results than one tool given a careless selection versus a precise one.
What Makes an AI Object Removal Look Real?
Beyond following a good workflow, it helps to know what your eye is actually checking for when you judge whether an edit "reads" as real. Five factors do most of the work.
Texture. Real surfaces, such as skin, fabric, grass, and concrete, have subtle, irregular variation. AI-generated fills sometimes come out too smooth or too uniform, which is what gives away a "painted over" look even when the color and shape are correct. When you inspect an edit, zoom in and ask whether the texture has the same roughness and randomness as the untouched areas around it.
Lighting. Light has a direction and a consistency across a photo: highlights fall on the same side of every object and shadows point the same way, while reflected light picks up color from nearby surfaces. AI fills occasionally get the average brightness right but miss the direction of light, which creates a patch that's technically the right shade but doesn't feel like it belongs to the same scene.
Perspective. Lines and edges, along with patterns, need to converge and scale correctly as they recede into the distance. This is where AI most often struggles on architecture and tiled floors, or fences. A reconstructed line that doesn't quite match the vanishing point of the rest of the image will look subtly "off," even to someone who couldn't explain why.
Edges. The boundary between the original photo and the generated fill should be invisible. A soft halo and a slight color shift, or an unnaturally sharp line at the edge of the removed area, is one of the most common tells. This is usually a selection problem rather than a generation problem, which is why refining your selection is often the fastest fix.
Shadows. Shadows carry a lot of information, including direction and softness, plus how they fall across uneven surfaces. An object removed without also removing (or correctly regenerating) its shadow is one of the single most common ways an AI edit gives itself away, because the shadow keeps implying something is there that no longer is.
If an edit still looks slightly wrong after a pass or two, checking it against these five factors, rather than just re-running the tool, usually tells you exactly what to fix.
AI Tools for Removing Objects from Photos
Tool features and pricing change often, and quality shifts too, so treat the specifics below as a snapshot rather than a permanent ranking, and confirm current details directly with each provider before choosing one. These five are genuinely different from each other rather than interchangeable, which makes the comparison more useful than a longer list of similar options.
- Adobe Photoshop (Generative Remove / Generative Fill). The most capable option for difficult edits, thanks to layer-based editing and manual masking, plus the ability to combine AI generation with traditional retouching in the same file. The tradeoff is a real learning curve and a subscription cost that's hard to justify for occasional use. Best suited to photographers and designers, or anyone editing images professionally.
- Google Photos Magic Eraser. Built directly into Google Photos, with automatic detection of common distractions like photobombers and power lines. It's fast and free for basic use, and requires no separate software, which makes it the lowest-friction option for casual users. It's less suited to complex or high-stakes edits, since it offers little manual control when the automatic result isn't quite right.
- Cleanup.pictures. A browser-based tool focused specifically on object removal and inpainting, with a simple brush-and-erase workflow and no account required for basic use. Because it's a dedicated tool rather than part of a broader editor, it tends to be quick to learn. It's a strong middle-ground choice when you want better results than a phone app but don't need a full editing suite.
- Luminar Neo. A desktop photo editor with AI object removal built alongside a full set of traditional editing tools. It suits people who want more control than a single-purpose app but don't need Photoshop's full complexity or cost. The AI removal features sit within a broader editing workflow, which is convenient if you're already doing other adjustments to the same photo.
- Mobile all-in-one editors (such as Picsart or similar apps). These bundle object removal with filters and background removal, plus other social-media-oriented editing tools, in one app. They're convenient if object removal is just one part of a larger editing routine, though results on complex backgrounds are typically less refined than a dedicated desktop tool.
| Tool | Best for | Ease of use | Difficult objects | Platform |
| Adobe Photoshop | Professional, high-stakes edits | Moderate–advanced | Strongest, with manual fallback options | Desktop |
| Google Photos Magic Eraser | Fast, casual fixes | Very easy | Limited on complex scenes | Mobile / web (Google Photos) |
| Cleanup.pictures | Dedicated, no-frills removal | Easy | Handles moderate complexity well | Browser |
| Luminar Neo | Photographers wanting more control | Moderate | Good, with manual refinement tools | Desktop |
| Mobile all-in-one editors | Casual, social-media edits | Very easy | Weaker on complex backgrounds | Mobile |
If you're editing casually and the object is simple, Google Photos or a mobile all-in-one app is usually enough. If you're working on a photo where accuracy and quality matter most, such as a wedding photo and a professional portfolio piece, or a listing photo, Photoshop or Luminar Neo will give you more control when the AI's first attempt isn't quite right.
AI Object Removal vs Photoshop
AI-assisted tools and traditional Photoshop techniques aren't competitors. They're suited to different situations.
Where AI wins:
- Speed. A removal that might take fifteen minutes of manual cloning and healing can take seconds with AI.
- Accessibility. You don't need to understand layers and masks, or the clone stamp tool, to get a usable result.
- Handling large, simple areas. AI is effective at filling big, uniform backgrounds like sky and grass, or plain walls.
Where traditional editing still wins:
- Precise control over exactly which pixels are used to fill a gap, which matters for reflections and fine patterns, or anything that needs to be physically accurate rather than just plausible.
- Complex composites where multiple source images need to be blended intentionally.
- Situations where the "correct" answer for what belongs behind the object is known and available, for example from a second photo of the same scene, rather than needing to be invented.
In practice, many experienced editors use both: AI for the first pass and traditional tools for final touch-ups on the areas AI didn't fully resolve. That hybrid approach tends to be faster than manual editing alone and more accurate than relying on AI exclusively.
Can AI Remove Anything From a Photo?
No, not entirely. AI object removal is a reconstruction process, not a recovery process. When you remove an object, the AI has no actual knowledge of what was physically behind it in the real world. It's generating a plausible fill based on patterns learned from other images. Most of the time, for common scenes, that guess is convincing. But it's still a guess.
This matters most when the hidden area contains something specific and irreplaceable: a unique piece of architecture and an identifiable background detail, or anything where accuracy matters more than plausibility. In those cases, AI removal can produce a result that looks clean but isn't actually correct. If you have access to another photo of the same scene without the obstruction, that's a better source for filling the gap than AI generation. And for reflections and fine patterns, or edits close to faces and hands, manual refinement after the AI pass is often necessary to get a result you can trust.
The honest takeaway: AI object removal is excellent for making unwanted elements disappear convincingly. It's not a tool for recovering information that was never captured in the first place.
Comments